The Rosebud mittens - pattern and descriptions
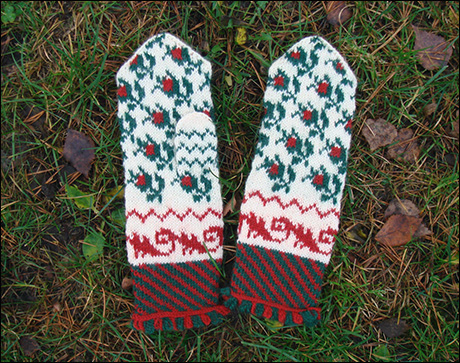
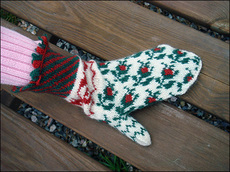
The Rosebud mittens have finally reached the point where I can publish a pattern for them, and give you all more details on them. The model for these mittens can be found in the collections of the Finnish National museum. The mittens are from Ilmajoki in Pohjanmaa in Finland. I have based my pattern on the drawings I made when I saw the picture of the mittens, and thus not having had the actual mittens in my hands, this is not an exact reproduction. The colours and the patterns of these mittens are more accurate than on the first pair of mittens I knitted in the end of last year.
If you want to learn more about the pattern, that without the zigzags is called the Kurikka mitten, go here!
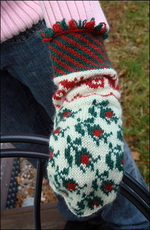
The swirling pattern above the diagonal coloured cuff is called ässänväärä, and is an old rococo pattern that also can be found on painted furniture in the same area. I haven't seen this pattern, as far as I can remember, on any other mittens than Finnish mittens from the Pohjanmaa area. Similar flower motifs as the rosebud, even if not exact the same, can be found in all of the Baltic Sea area, in Estonian, Swedish and Finnish mittens.
These mittens involve long strands on the inside of the mittens. This is an issue you have to decide how to deal with. First of all, you can weave in the yarn not in use. I don't like this method, since I can't do it without contorting the stitches, and having, especially when using colours so far from each as in this mitten, the yarn woven in to show up on the right side. The second option is to strand the yarn not in use on the backside. This will cause some difficulties when putting your hand into the mitten, you risk to be caught up in the strands with your fingers, and if the mitten is made for a child, this problem will be accentuated. As I see it, you have three ways to deal with the problem. You can use a thin yarn and knit an inner mitten, thin angora yarn for example would make a wonderful inner mitten for the hand part of the mitten. The inner mitten can be knitted loosely and be very open in its texture, the only aim of the inner mitten is to protect the strands from your fingers being caught up in them. The second option is to lightly felt the inner side of the mitten. This will happen naturally when you wear the mitten, and if you're careful enough, it might be the only thing you need to do. With these mittens I will go for a light felting, and hope it will be enough to protect the strands until the inside naturally felt up more. The third option is to do nothing, just being extremely careful when putting your hand in the mitten, and then hope for a fast self-felting.
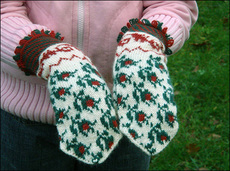
Yarn: Vuorelma Satakieli or similar 2 ply 100% wool. I have used the colours 001 (off white), 491 (red) and 890 (green).
Needles: 2mm and 2,5 mm dpns.
Gauge: 36 stitches and 40 rows to make 10 x 10 cm (4" x 4")
Finished size: From fringe to top 25 cm, around the hand 17 cm (suitable for my 11 yo daughters hand).
Left hand mitten:
Cast on 60 stitches with 2mm needles. I have made a tutorial of how to do this fringe cast on with two colours in the way Mary Olki instructs to do it in her book "Kirjokintaita ja muita kansanomaisia neuletöitä" from 1950's. Cast on three stitches in green and two stitches in red. When you have finished the cast on, decrease on stitch on the first pattern row in order to get the stripes to overlap neatly. Start knitting according to the pattern. When you have finished the striped cuff, change to white and 2,5 mm needles and increase one stitch before starting the ässänväärä pattern. You have now 60 stitches on your needles, divided evenly on four dpns. Continue knitting according to the pattern.
Thumb: When you have finished the first row of rosebuds, knit 18 stitches according to the pattern. Knit 11 stitches with a waste yarn, then slip these 11 stitches back on the left needle and continue in pattern.
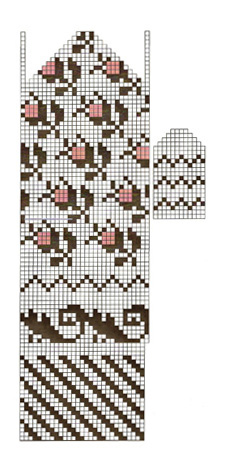
Shape top: When half way through the fifth rosebud row (or when mitten reaches approx to the top of the little finger) start decreasing at the end of the second and beginning of the third needle. Slip the two last stitches on the second needle at once as if to knit, knit the first stitch on the third needle and pass the two slipped stitches over the knitted stitch. Leave the knitted stitch on the second needle. Two stitches decreased. Continue in pattern until the two last stitches on the fourth needle are left. I prefer to knit the last stitch before the decreases (the one that will be decreased on next row) in the same colour as the decrease will be, I think it makes the decreased stitches more even in colour, but you can knit the pattern until the last stitch if you want to. Continue decreasing this way until you have eight stitches left. Break the yarn, and thread it through the remaining stitches.
Thumb: Remove the waste yarn and pick up 11 stitches for the front and for he back of the thumb. Knit according to the pattern, but pick up one stitch in the beginning of the first and the third needle, you will now have 24 stitches on four needles. Two rows after the third zigzag row start the decreases for the top, using the same method as when decreasing for the top of the hand.
Right hand mitten:
Knit as the left hand mitten, but when you have knit the first rosebud row, knit 31 stitches before knitting 11 stitches with waste yarn for the thumb. The thumb will be knitted at the beginning of the third needle, when the left thumb was at the end of the second needle.
Download a sharper chart for the mittens here! Requires Excel.
If you decide to knit these mittens, I would love to see pictures of your interpretation! Please leave a comment with a link, or email me! If you have problems understanding the pattern, feel free to contact me. You can reach me at mfast(at)welho.com (remove the () around @).
And remember! This pattern is for personal use only! You’re not allowed to sell or distribute it, or to sell mittens you have knitted from it. You can print a copy for your personal use, but for any other use of the pattern or any pictures in it, you must contact me and ask for permission. If you want to know more about copyright, you can take a look here: What is copyright protection?

Comments
These are beautiful, Maud. I love all of your mittens! Glad to see the computer finally decided to cooperate.
Posted by: Christine Link | November 8, 2007 11:09 AM
They are so beautifull! I almost couldn't wait until the description was ready. And now I cannot open the chart!
I'll have to wait until someone with al lot of computerknowledge comes by.
Posted by: arjanne | November 8, 2007 12:18 PM
Maud, your mittens are beautiful!! Thank you so much for your time in sharing this pattern with us all. I wish I did not have so many projects going right now, I would love to make these!!
Posted by: mel | November 8, 2007 02:32 PM
Maud, You are so very talented. Thank you for sharing this pattern. I've always wanted to learn how to knit a mitten, and your pattern instructions sound so easy. This will be my first!
Posted by: Mary | November 8, 2007 05:57 PM
Thanks so much for sharing your pattern, and for sharing tips on stranding too. I love coming to your blog and seeing what you've been up to.
Posted by: Steffi | November 8, 2007 06:48 PM
What a gorgeous pattern, thank you for sharing it with us.
Posted by: Lin | November 8, 2007 11:12 PM
Thank you for sharing your pattern, and on such beautiful mittens as well :D
Posted by: Ann | November 9, 2007 12:28 AM
Oh wow! Thank you for sharing!
Posted by: tiennie | November 9, 2007 02:29 AM
Maud, They are absolutely beautiful!!! And the two color fringe is absolutely great on them. Thanks for sharing the pattern, too. Don't let the new puppy get near them.
Nancy
Posted by: Nancy | November 9, 2007 05:23 AM
I can't wait until I get a chance to try these out, and thank you so much for your tips on what to do with the inside. I have a pair now that I'm going to attempt to felt a bit on the inside :)
Your one smart cookie Maud, wonderful mitten and pattern.
Posted by: michelle | November 9, 2007 06:47 AM
Maud, the mittens you designed and knit are BEAUTIFUL. Thank you for being so generous with your design!
Posted by: Brenda | November 10, 2007 03:14 PM
Now Maud, why aren't you writing a knitting book!!! Your too talented--someone should sign you on:-)
Posted by: Suzanne | November 11, 2007 02:26 PM
Thank you so much for publishing this pattern. I can't wait to make some. They're lovely.
Posted by: Marji | November 12, 2007 04:28 AM
they're gorgeous! what a generous pattern to give out to all of us. thank you for sharing!
Posted by: jody | November 12, 2007 07:01 PM
Oh....Thank you, thank you , thank you!
They're so lovely and I can wait to buy some yarn to make these for my little girl.
Posted by: wendy | November 13, 2007 05:17 PM
Så vackra rosor!
Posted by: Monica Hansen | November 15, 2007 11:57 AM
They are beautiful and an inner mitten would make them perfect for those days when winter really hits us and the mercury drops to -40 and below.
Posted by: Dorothy | November 15, 2007 07:50 PM
Nydelige votter. Takk for at du deler mønsteret med oss.
Posted by: IdaE | November 19, 2007 10:06 AM
you are such a talented knitter! What beauties these are! Happy New Year and i'm looking forward to another year of reading your blog and envying your knitting abilities!
Posted by: janetd | December 29, 2007 10:42 PM
Nydelige votter du har strikket. Hilsen Niko Norway
Posted by: Niko | March 30, 2008 07:09 PM