Venezia's V-neck
This posting is long over due, but thanks to a gentle reminder from my e-mail list friend Nissa that I haven’t posted the Rosebud mitten pattern, I realized I haven’t posted the Venezia alterations either. I’ll start with Venezia, and the Rosebud mitten pattern will follow very soon, I promise.
This is how I changed my Venezia pullover to have a V-neck line instead of the boat neck the pattern gives instructions for. The instructions are for the second smallest size, 34 ½ “.
On the first row number 18 of the body chart, put the centre stitch on a piece of scrap yarn, and cast on 11 stitches for the front steek. The border stitches are knitted in the background colour. Decrease before the steek as a slip slip knit decrease and after the steek as a knit 2 tog decrease, just as you have done with the arm opening steeks. Decrease on every row 22 times, then on every second row until you have the desired amount of stitches left for the shoulders. I left 16 stitches for the shoulder. Continue knitting without decreases. When the arm opening has reached the last row number 18 on the colour chart, put the stitches for the neck on a scrap yarn. There should be 103 stitches left on the back piece, put 97 on a scrap yarn, and cast on 11 stitches for the neck steek. Decrease on stitch on both sides of the neck steek in the same way as for the front three times. On row 24 of the colour chart, bind off the steeks except for the border stitches of the steek. You do now have 18 stitches on every shoulder piece, 16 stitches for the shoulder and two border stitches. Knit the right front shoulder to the right back shoulder, using a three-needle-bind off. Do the same with the left shoulder. If you want to reinforce the arm openings with crochet, do it now. Don’t reinforce the V-neck steeks; it will only make them bulky. Since they will be hidden inside the edge, they will felt and won't open. Cut up the front and back steeks for the neck opening.
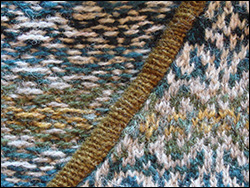
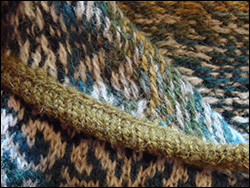
Pick up stitches for the edge between the two stitch legs in the border stitch on the right side of the pullover. I used 3 mm circular needle. You will have a decreased stitch, a half background coloured stitch and then will the edge begin. I picked up 53 on the right side of the neck, the central front stitch, 53 stitches on the left side and the 97 stitches from the neck. I knitted ten rows, but I think twelve or even more would be better.
The decreases and increases at the centre front: You have to decrease at the centre front for what will be the front on the edge, and the again increase the same amount of stitches on the back. I made a decrease on the front that I don’t know what it’s named, I have used it for mitten thumbs when I want there to be just one stitch row showing in the top decreases. One stitch before the centre stitch, put the right needle into the centre stitch knitwise, slowly and carefully ease the stitch before the centre stitch away from the left needle, slip the centre stitch away from the left needle, and pick up the stitch before the centre stitch. You will now have the stitch after the centre stitch and the stitch before the centre stitch on the left needle. Knit them together, then slip the centre stitch over the. The result is a decrease behind the centre stitch. If you have decided to knit all in all twelve rows, do this six times on every row for a steep V, three times on every second row for a less steep V. On the backside, simply increase one stitch on both sides of the centre stitch as many times as you decreased on the front.
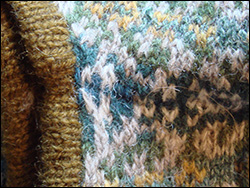
When you have knitted all the edge rows, take a 2,5 mm needle, pick up on the wrong side the purl bump, that is the bar of old gold that is left between the stitches on the back side of the first row of the edge. Just pick up them, don’t knit them. Fold the edge in half with the knit side on the outside, keep the needle with the picked up stitches behind, both needles in the left hand. The steek will now be inside the edge. Carefully match the stitch in the edge and the stitch picked up knit them together and bind off at the same time using the three-needle bind off. The inside of the neck line will be very neat and the steek hidden inside the edge.
If I would redo Venezia’s neck I would probably leave 18 or 20 stitches for the shoulders, and knit the edge two or four rows further. It’s not enough to actually redo it, but for you who considers the alterations, think about it.

Comments
Good morning dear Maud :o)
One day, when I have graduated to *genius knitting*, I will *re*-visit this wonderful post! Have the loveliest day.
Jewels
Posted by: Jewels | June 20, 2007 03:36 PM
Hello Maud,
I got the link to your blog from our mutual friend, Don Potter, here in Rochester, MN. Your knitting is fantastic! The Venezia sweater is so beautiful and I love the colors, so soothing and blending together so well. I've added your link to my blog site and will be checking back regularly for more knitting inspiration.
Posted by: RuthieJ | June 21, 2007 12:02 AM
It came out beautifully!
Posted by: tiennie | June 21, 2007 02:21 AM
thanks so much for your update! it will be very helpful when I start my venezia.
Posted by: Lois | June 21, 2007 08:14 AM
Thank you so much, Maud! I appreciate your taking the time to write this in so much detail. I am just about to start my sweater, and your directions will be very very useful!
Posted by: Gauss | June 30, 2007 05:36 PM
Thank you so much for this. I am starting Venezia when the school holidays are finished here so I will look at the instructions then!
Posted by: Lin | August 9, 2007 06:25 PM